Meatloaf is a dish, in America made with basic ingredients that come together to create a satisfying and cozy meal. Despite its popularity meatloaf is not considered a gourmet or extravagant dish. Essentially it consists of meat combined with bread crumbs, eggs, vegetables and seasonings all mixed into a yet mound.
When its enveloped in a blanket of bacon weave and kissed by the essence of charcoal smoke it truly becomes a delightful sight!
We’re excited to share this recipe with you!
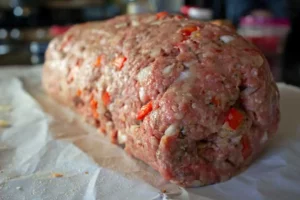
Cheese Stuffed Meatloaf
For this recipe you can use any melting cheese. We suggest trying Danish Fontina Cheese. We picked Fontina for its texture and excellent melting qualities.
Fontina cheese boasts an creamy taste, with a buttery roasted nut flavor, complemented by an aroma that some might describe as pleasantly pungent. It’s safe to say most cheeses have their scent don’t you think?
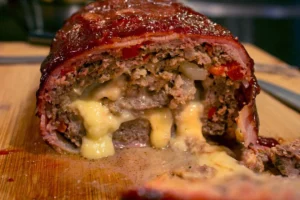
Fontina is a cheese that melts smoothly in your mouth. Its thick consistency helps it stay intact during cooking without leaking out before you’re prepared to cut into the meatloaf.
Cherry Wood & Cedar Wood Plank
This marked our chance to work with cherry wood. We opted for this type of wood due, to its fruity taste that pairs well with the smokiness of any meat. Given that we prepared pork and beef it turned out to be a match, for the meatloaf.
We included a cedar wood plank alongside the cherry wood. Cedar tends to have a flavor so the cherry wood balances, out some of the cedars distinctive characteristics.
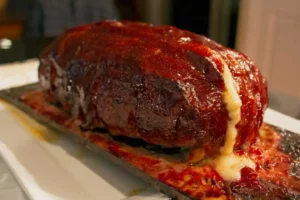
Before smoking the cedar wood plank is soaked in water for an hour. This process prevents the plank from burning. Also adds moisture creating a layer, between the grilling grate and the meatloaf. By using the plank you can prevent the meatloaf from sticking to the grate. Make it simpler to carry back, to the kitchen once its finished cooking.
Best Woods For Smoking Meatloaf
- Oak
- Hickory
- Pecan
- Mesquite
- Cherry
- Apple
- Maple
Helpful Equipment and Supplies
- charcoal grill or smoker
- charcoal
- charcoal chimney
- cedar plank
- cherry wood chunks or wood chips
- drip pan (large enough to catch excess drippings from meatloaf)
- probe thermometer and/or instant-read thermometer*
- basting brush or a mop
- grilling spatula
Ingredients Needed To Make Smoked Meatloaf
The complete list of ingredients, with measurements can be found on the recipe card provided at the conclusion of this article.
For the Meatloaf:
- Bread: slices or breadcrumbs
- Milk: can be whole or skim. The milk is for soaking the bread.
- Meat: We combine parts of ground beef (chuck). Freshly ground pork to enhance the flavor. If you opt for ground beef be prepared to compromise on taste a bit.
- Veggies: diced white onion, and red bell pepper
- Egg: In recipes beaten eggs serve as the binder, for the ingredients. It’s a misconception that eggs add moisture to meatloaf. Their main role is to act as a binding agent that holds everything together and prevents the ingredients from crumbling. It’s best not to exceed one or two eggs in any meatloaf recipe as using egg can result in a dense and spongy texture.
- Umami: (savoriness) Worcestershire sauce. You can substitute it with fish sauce or soy sauce.
- Herbs & Spices: Incorporate dried basil, dried oregano crushed red pepper flakes, Kosher salt and ground black pepper according to your taste preferences.
- Cheese: Danish Fontina Cheese sliced into ⅛ to ¼ inch slices (or favorite cheese)
- Bacon: for wrapping the meatloaf.
For the Glaze
If you don’t want to make the glaze, you could also use your favorite bbq sauce.
- Ketchup
- Dark Brown Sugar
- Worcestershire Sauce
How To Make Bacon-Wrapped Smoked Meatloaf
Detailed instructions are provided in the recipe card at the end of this post.
1. Soak the Cedar Plank
Soak the cedar plank in water for at least 30 minutes.
2. Prep the Meatloaf for Smoking
- Soak the Bread: Soak the bread in milk for five minutes. Next gently press out the milk from the bread. Tear it into small manageable pieces.
- Mix the Meatloaf: It’s best to use wet hands. (see tips)
- Press the Meatloaf: press the meatloaf mixture into a ½–inch thick square shape on the clean work surface.
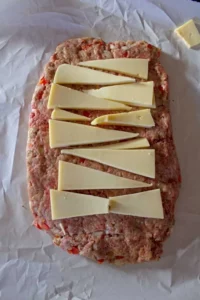
- Add Cheese and Roll: Place the cheese on top of the flattened meatloaf then roll it up making sure to tuck the cheese to create a loaf.
- Wrap the Meatloaf in Bacon: Wrap the meatloaf with bacon by placing it on the bacon weave and rolling it around. Then position the meatloaf in the middle of the cedar plank that has been soaked making sure the seam side is facing downward.
How To Make A Bacon Weave
You can either make a bacon weave following the instructions, in the video provided or wrap strips of bacon, around the meatloaf. Fasten them with toothpicks or skewers.
Tips for Preparing the Meatloaf
- Use any type of bread that you already have in your kitchen even the crusts will work. You can also opt for bread crumbs if you happen to have them on hand.
- Mixing the meatloaf with hands is more convenient. The water, on your hands prevents the meats oils from sticking making it easier to blend the ingredients and wash your hands afterwards. You might need to moisten them a couple of times.
- Make sure not to mix the meatloaf. Apply pressure while combining the ingredients. Avoid squeezing it excessively. Mixing the meat vigorously can result in an dense texture, for the meatloaf.
- I’ve found that freezer paper is really handy, for keeping my countertops tidy when working on tasks, like this! Alternatively you could also use parchment paper or wax paper.
3. Prep the Grill For Smoking
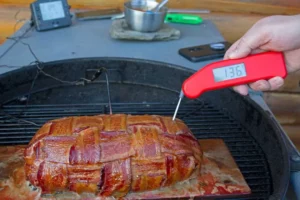
David cooked this meatloaf on his Weber Performer by setting up the grill for the two zone heat method placing a drip pan right under the meatloaf. The drip pan is there to prevent grease from the meatloaf from dirtying the inside of the grill.
Remember to heat up your smoker to 250 degrees Fahrenheit. To keep the temperature low just use half the amount of charcoal you typically do which’s about half a chimney full.
4. Smoke the Meatloaf
- Once the coals are hot. The smoker reaches a temperature of 250 degrees place the meatloaf on the grill above the drip pan. Remember to insert the probe into the center of the meat, for cooking.
- Place some cherry wood pieces over the burning coals. Cover the grill. Let it cook.
- Set the temperature to 250 degrees Fahrenheit. Adjust the vents to control the heat.
5. Low and Slow
- Please cook the meatloaf until the inside temperature of the meat reaches between 155 and 160 degrees Fahrenheit. This process typically takes 2 and a half, to 3 hours.
- Be sure to check the pit temperature and aim to keep it, around 250 degrees Fahrenheit. Avoid opening the lid unless necessary for adding charcoal or wood chunks to regulate both temperature and smoke. Using a probe thermometer can be quite useful, in this process!
6. Never mind the Stall
When cooking meatloaf the outer layer evaporating can make the inside temperature stay the same for a while. BBQ experts call this “the stall.” No need to worry. The fat, from the bacon will eventually melt. Just keep the heat steady. Wait for it to pass.
7. Glaze The Smoked Meatloaf
After smoking for two hours the meatloaf should be nearing the temperature range of 155 to 160 degrees Fahrenheit. At this stage it’s time to prepare the glaze or your preferred barbecue sauce.
8. Check for Doneness
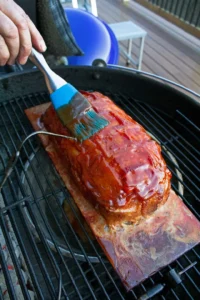
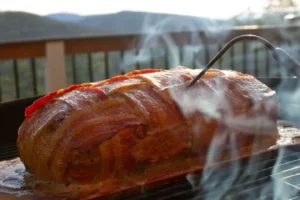
- Remember to brush the meatloaf with glaze every 15 minutes and make sure to use a read thermometer to check for doneness each time you open the grill. Although a probe thermometer is useful it’s also good to check parts of the meatloaf for cooking.
- Bake the meatloaf and brush on glaze as desired until the meatloaf reaches an internal temperature of 155 degrees Fahrenheit. Keep in mind that there may be some heat so it’s best to take out the meatloaf once it hits 155 degrees Fahrenheit.
9. Remove the Smoked Meatloaf, Rest & Serve
Once the meatloaf is cooked gently transfer it along with the cedar plank onto a cutting board or serving platter. Let the meatloaf rest for 15 minutes before you slice it and serve.
No Pit? No Problem!
This recipe, for smoked meatloaf was tried out in the oven first before smoking it on the grill. You can savor this meatloaf even if you don’t have a grill or smoker, for that smoky taste. Just follow the directions provided in the recipe card.
We suggest baking it on a wire rack placed over a baking sheet of using a loaf pan due, to grease accumulation.
Leftover Meatloaf Storage
Make sure to store any meatloaf by wrapping it in heavy duty foil or keeping it in an airtight container, in the fridge for, up to three days. My friend David and I can’t stop raving about how delicious this bacon wrapped smoked meatloaf turned out. I must admit it’s the meatloaf I’ve ever had! Adding a flavor gives a fun twist to this comfort food elevating its taste to new heights. So get your grill or smoker ready. Give this recipe a shot. You won’t be disappointed!
Tips, Tricks & FAQs
What’s your #1 tip for this recipe?
Be sure to have a meat thermometer ready so you can tell when your meatloaf is cooked perfectly. While I can share the times I’ve used it’s important to remember that sometimes food has its agenda. You wouldn’t want a meatloaf just because I mentioned 2.5 hours when you actually only needed 2 hours!
How long does it take to smoke a meatloaf?
2.5 hours or so
What temp do you smoke meatloaf at?
I usually stick to 225 degrees when smoking food. Its low enough to infuse that flavor without dragging out the cooking process all day.
What can I use instead of breadcrumbs?
You can use more oats or even torn up slices of bread soaked in milk.
What can I use instead of eggs?
You can use torn up slices of bread soaked in milk.
Can I stuff the meatloaf with cheese?
I’ll shape the base of the loaf place slices of cheese, in, between and then add the remaining meatloaf on top. Make sure to seal all edges to keep the cheese in the center of the loaf.
What kind of pellets should I use to smoke the meatloaf?
There are types of pellets that’re compatible, with your Traeger pellet grill. Personally I prefer to stick with the Traeger Signature Blend, which combines Maple and Cherry flavors. However if you’re aiming for a taste, for ground beef the top choices would be Hickory, Mesquite or Pecan.
Can you freeze leftovers? How do you reheat and store leftovers?
The meatloaf recipe yields portions for 6 8 slices. However you may end up with some leftovers! Simply store them in a container. Keep them in the refrigerator, for up to a week or freeze them for as long as three months. When reheating warm them in the microwave for 2 3 minutes or in an air fryer, for 6 8 minutes.
What if I don’t have a pellet smoker? How would I make this on a regular grill? Or what if I want MORE smoky flavor?
If you’re looking to enhance the smoky taste you have a choices! You can use these methods on a charcoal or gas grill. They can also intensify the smokiness on your smoker.
Before firing up the grill make sure to soak the wood chips in water for 30 minutes. One cup of wood chips should give you a 20 minute burn. Remember to add chips to the grill as needed during the grilling process.
When using a charcoal grill start by lighting the coals until they’re ready. Once prepared move them to one side of the grill. Add some wood chips on top. Position your food on the side without heat to cook it evenly with indirect heat.
My buddy Nick showed me this thing called a smoker tube! It’s basically a metal tube, with holes where you put Traeger pellets and light them up with a butane lighter. Once the pellets start burning let them catch on fire and then blow out the flames. Place the tube in the grill close the lid. Enjoy that smoky flavor it adds to your food!

I spent a good bit of my 20’s touring the country playing music. As a teenager, and throughout my 20’s, in between music, I always worked in restaurants, in various capacities. Somewhere in my late 20’s I realized that I was not on the cover of Rolling Stone, as planned, and so, I started thinking about my future and trying to figure out other ways to have an impact, be creative and still live a bit of that rock ‘n roll lifestyle. The restaurant industry provided me with a good bit of those things. And so, I started honing my chops in the kitchen, putting my nose in food lover’s companion, and really started to go somewhere with it.